-
Tutor/Teacher
-
- Assessment Settings
- Create a Section-wise Assessment
- Creating a proctored assessment.
- Creating a Random Assessment
- Creating an Adaptive Assessment
- Creating an Assessment
- Creating an Audio Question
- Creating Questions for Assessment.
- Download the Results
- Duplicate Assessment
- Evaluating attempts of Students
- Review questions of an assessment
- Review Student’s results and attempts
- Sharing Assessment URL
- Upload Questions using an Excel template
- Upload Questions using Word Template
- Show Remaining Articles (1) Collapse Articles
-
Student
-
- Answering Descriptive Questions
- Attempt Assessment using URL
- Attempt Fill In The Blank Question
- Attempting a Section-Adaptive Assessment
- Attempting an Assessment
- Attempting Coding Question
- Creating a proctored assessment.
- Creating an Adaptive Assessment
- Learning Assessment
- Review the results and get recommendations
-
Parent / Mentor
-
Publisher
-
- Assessment Settings
- Create a Section-wise Assessment
- Creating a proctored assessment.
- Creating a Random Assessment
- Creating an Adaptive Assessment
- Creating an Assessment
- Creating an Audio Question
- Creating Questions for Assessment.
- Duplicate Assessment
- Sharing Assessment URL
- Upload Questions using an Excel template
- Upload Questions using Word Template
-
Institute/Director
-
Admin
Proctoring Students in assessment.
Having an assessment proctored offers a layer of security and transparency. Students who try proctored assessments are less likely to commit malpractice, and proctors may readily examine students’ behavior and point out any item of suspicion by monitoring the video.
Follow the steps below to Proctor an assessment.
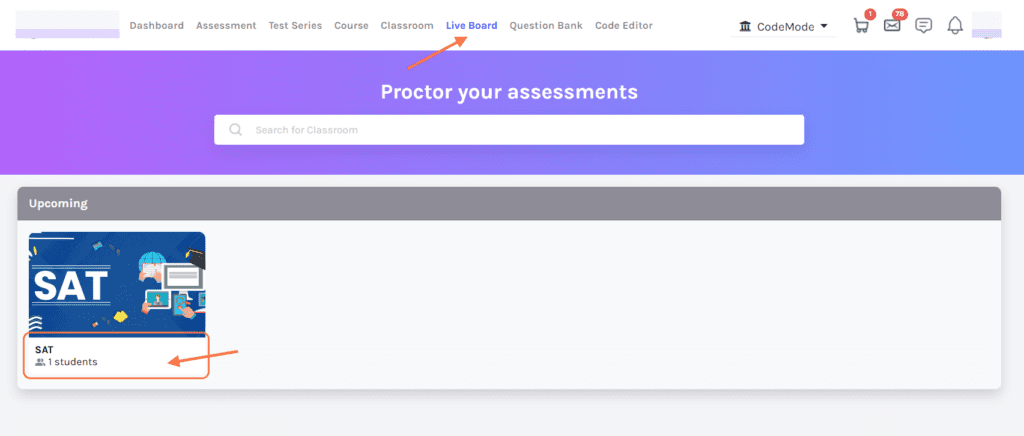
After logging in, your dashboard will be displayed; click on Live Board from the top panel.

A list of Upcoming and Ongoing assessments will be visible.
Once the time starts/the assessment is live, click on the assessment to the proctor.
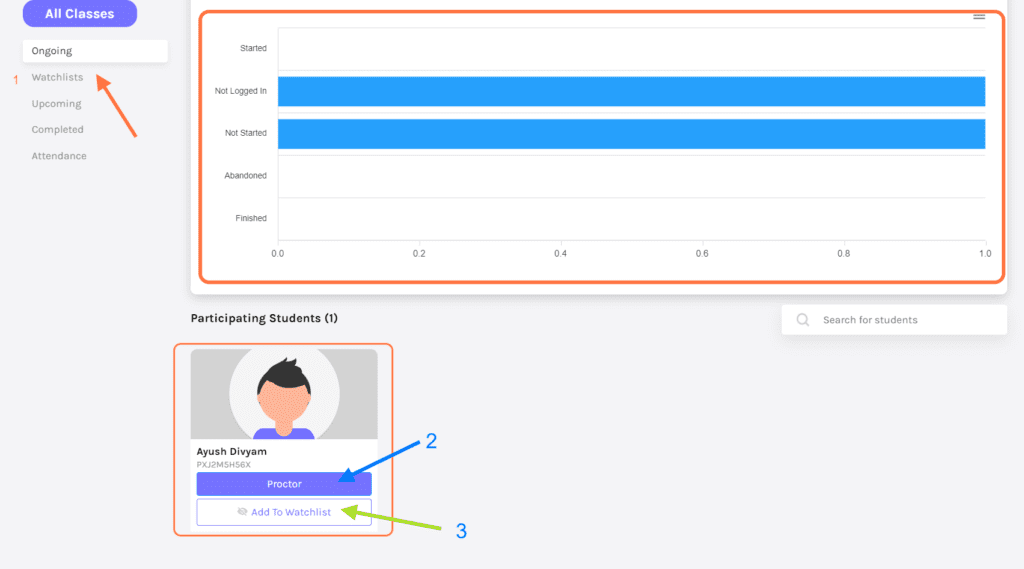
Once the assessment starts, the graph shows the number of students who’ve logged/not logged in, not started, abandoned, or maybe finished the test.
Down below the graph, the list of participating students will be visible.
To proctor, any student individually, click on Proctor. {Refer image-1 point 2}
If you find anything suspicious, you may add the student to a separate watchlist by clicking on the Add to Watchlist option. {Refer Image-1 point 3}
The watchlist can be accessed using the menu option from the left side of the screen. Click on Watchlist. {Refer Image-1 point 1}

Proctoring Student Individually
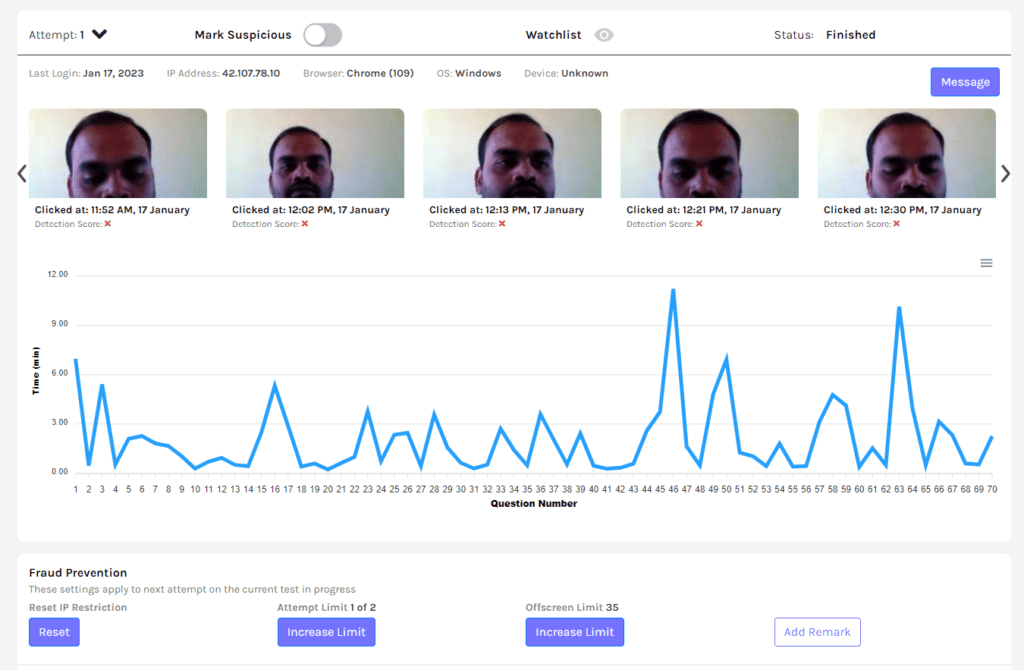
After clicking on Proctor for any student, you can monitor them individually.
You may proctor any student live, by clicking on the ‘View video.’

The system also provides details about the student’s attempt; the graph shows the time the student took to answer each question in the assessment.
Attempt: This shows the current number of attempts the student has taken to complete the assessment. The drop-down list can be used to view the data of previous attempts.
Add to watchlist and mark suspicious are the options you may use to tag students who appear to be involved in malpractices.
Fraud Prevention: This allows you to alter some basic settings of the assessment session. The changed settings will be applicable from the next attempt of the student.
- Attempt Limit: Number of times students may attempt the assessment.
- Off-Screen Limit: Number of times students may leave the test window on their system and can navigate. Once declared, if the student crosses the offscreen limit, the test will automatically be submitted.
- Reset IP Restriction: Clicking the reset button will reset the IP restrictions for the next attempt.
- Remarks: You may add remarks which will be visible to other teachers when they will come to proctor the student.

Later the teacher can review the protected history of the student, genuine score, and other details in the attempt history.

